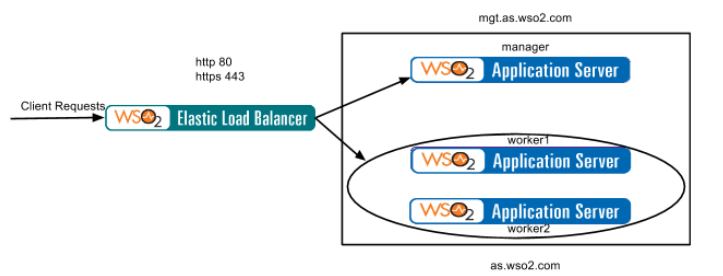
This blog describes how to setup WSO2 Application Server worker/manager cluster with WSO2 Elastic Load Balancer.
1. Deployment Diagram
4. Configure the HTTP/HTTPS proxy ports to communicate through the load balancer
WSO2 Elastic Load Balancer - 2.1.0
WSO2 Application Server - 5.2.1
1. Deployment Diagram
2. Configure the load balancer
1. Unzip the WSO2 ELB
2. Setting up the load balancing configuration
Edit “<ELB_HOME>/repository/conf/loadbalancer.conf” file
appserver {
domains {
wso2.as.domain {
tenant_range *;
group_mgt_port 4500;
worker {
hosts as.wso2.com;
}
mgt {
hosts mgt.as.wso2.com;
}
}
}
}
|
3. Setting up the cluster configurations
Edit “<ELB_HOME>/repository/conf/axis2/axis2.xml” file as follows
<clustering class="org.wso2.carbon.core.clustering.hazelcast.HazelcastClusteringAgent" enable="true">
<parameter name="membershipScheme">wka</parameter>
<parameter name="domain">wso2.carbon.lb.domain</parameter>
<parameter name="localMemberHost">127.0.0.1</parameter>
<parameter name="localMemberPort">4000</parameter>
|
4. Configuring the ELB to listen on default ports
Edit “<ELB_HOME>/repository/conf/axis2/axis2.xml” file as follows
<transportReceiver name="http" class="org.apache.synapse.transport.passthru.PassThroughHttpListener">
<parameter name="port">80</parameter>
</transportReceiver>
<transportReceiver name="https" class="org.apache.synapse.transport.passthru.PassThroughHttpSSLListener">
<parameter name="port" locked="false">443</parameter>
</transportReceiver>
|
5. Mapping the host names to the IP
Update the “/etc/hosts” file
<IP-of-worker> as.wso2.com
<IP-of-manager> mgt.as.wso2.com
|
3. Configure the manager node
1. Unzip the WSO2 AS
2. Setting up the cluster configurations
Edit “<AS_HOME>/repository/conf/axis2/axis2.xml” file as follows
<clustering class="org.wso2.carbon.core.clustering.hazelcast.HazelcastClusteringAgent" enable="true">
<parameter name="membershipScheme">wka</parameter>
<parameter name="domain">wso2.as.domain</parameter>
<parameter name="localMemberHost">mgt.as.wso2.com</parameter>
<parameter name="localMemberPort">4100</parameter>
*** Specify this node belongs to the management sub domain
<parameter name="properties">
<property name="backendServerURL" value="https://${hostName}:${httpsPort}/services/"/>
<property name="mgtConsoleURL" value="https://${hostName}:${httpsPort}/"/>
<property name="subDomain" value="mgt"/>
</parameter>
*** Specify the well known member
<members>
<member>
<hostName>127.0.0.1</hostName>
<port>4500</port>
</member>
</members>
|
3. Configuring the port offset and host name
Edit “<AS_HOME>/repository/conf/carbon.xml” file as follows
<Offset>1</Offset>
<HostName>as.wso2.com</HostName>
<MgtHostName>mgt.as.wso2.org</MgtHostName>
|
4. Configure the HTTP/HTTPS proxy ports to communicate through the load balancer
Edit “<AS_HOME>/repository/conf/tomcat/catalina-server.xml” file as follows
<Connector protocol="org.apache.coyote.http11.Http11NioProtocol"
port="9763"
proxyPort="80"
<Connector protocol="org.apache.coyote.http11.Http11NioProtocol"
port="9443"
proxyPort="443"
|
4. Configure the worker node
1. Unzip the WSO2 AS
2. Setting up the cluster configurations
Edit “<AS_HOME>/repository/conf/axis2/axis2.xml” file as follows
<clustering class="org.wso2.carbon.core.clustering.hazelcast.HazelcastClusteringAgent" enable="true">
<parameter name="membershipScheme">wka</parameter>
<parameter name="domain">wso2.as.domain</parameter>
<parameter name="localMemberHost">as.wso2.com</parameter>
<parameter name="localMemberPort">4200</parameter>
*** Specify this node belongs to the management sub domain
<parameter name="properties">
<property name="backendServerURL" value="https://${hostName}:${httpsPort}/services/"/>
<property name="mgtConsoleURL" value="https://${hostName}:${httpsPort}/"/>
<property name="subDomain" value="worker"/>
</parameter>
*** Specify the well known member
<members>
<member>
<hostName>127.0.0.1</hostName>
<port>4500</port>
</member>
</members>
|
3. Configuring the port offset and host name
Edit “<AS_HOME>/repository/conf/carbon.xml” file as follows
<Offset>2</Offset>
<HostName>as.wso2.com</HostName>
|
4. Configure the HTTP/HTTPS proxy ports to communicate through the load balancer
Edit “<AS_HOME>/repository/conf/tomcat/catalina-server.xml” file as follows
<Connector protocol="org.apache.coyote.http11.Http11NioProtocol"
port="9763"
proxyPort="80"
<Connector protocol="org.apache.coyote.http11.Http11NioProtocol"
port="9443"
proxyPort="443"
|
5. Create the worker2 node
Get a copy of worker1 node and change the following
<parameter name="localMemberPort">4300</parameter>
<Offset>3</Offset>
|
5. Testing the cluster
1. Start the ELB
sudo <ELB_HOME>/bin/wso2server.sh
2. Start the manager node
sudo <AS_HOME>/bin/wso2server.sh
3. Start the worker1 and worker2 nodes
sudo <AS_HOME>/bin/wso2server.sh -DworkerNode=true
4. Check member joined messages in all consoles
5. Access management console https://mgt.as.wso2.com/carbon
6. Test load distribution - create jaggery app to log a message - http://as.wso2.com/sample
Comments