This blog describes how to setup WSO2 Application Server worker/manager cluster without using WSO2 Elastic Load Balancer and later we can use this cluster for configure different 3rd party load balances
WSO2 Application Server - 5.2.1
1. Use Cases
Each use case consist of 3 WSO2 AS instances form worker/manager cluster fronting with load balancer.
Use Case 1:
Requests direct to worker node cluster through LB
No access to admin console through LB

Requests direct to worker node cluster through LB.
Allows to access admin console through LB.
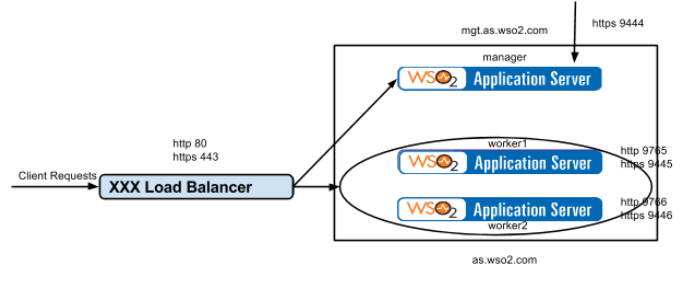
Use Case 3:
Requests direct to worker node cluster through LB.
Allows to access admin console through LB.
Additionally manager node also serve requests. (Here manger node work as both worker and manager)
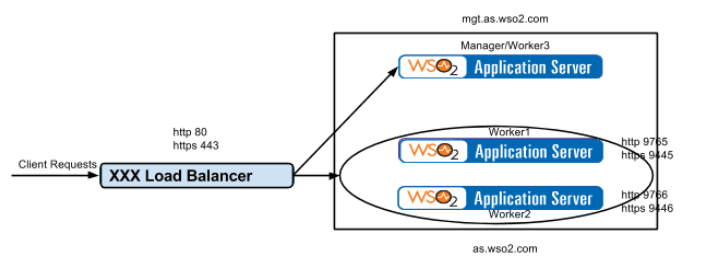
Manager/Worker3
|
Worker1
|
Worker2
| |
offset
|
1
|
2
|
3
|
localMemberPort
|
4100
|
4200
|
4300
|
http
|
9764
|
9765
|
9766
|
https
|
9444
|
9445
|
9446
|
2. Tips to configure 3rd party load balancer
In order to configure the load balancer, need to consider the following
-
Load balancer ports are http 80 and https 443
-
Direct the http requests to the worker nodes with load balancing as http://as.wso2.com/<service> via http 80 port
-
Direct the https requests to the worker nodes with load balancing as https://as.wso2.com/<service> via https 443 port
-
Access the management console as https://mgt.as.wso2.com/carbon via https 443 port
In WSO2 AS cluster worker nodes server requests on http 9763 and https 9443 ports and can access the management console https 9443 port.
Load balancer ports are http 80 and https 443
Direct the http requests to the worker nodes with load balancing as http://as.wso2.com/<service> via http 80 port
Direct the https requests to the worker nodes with load balancing as https://as.wso2.com/<service> via https 443 port
Access the management console as https://mgt.as.wso2.com/carbon via https 443 port
3. Configure the Manager node
1. Unzip the WSO2 AS
2. Setting up the cluster configurations
Edit “<AS_HOME>/repository/conf/axis2/axis2.xml” file as follows
*** Enable clustering for this node:
<clustering class="org.wso2.carbon.core.clustering.hazelcast.HazelcastClusteringAgent" enable="true">
<parameter name="membershipScheme">wka</parameter>
<parameter name="domain">wso2.as.domain</parameter>
<parameter name="localMemberHost">mgt.as.wso2.com</parameter>
<parameter name="localMemberPort">4100</parameter>
|
*** Specify the well known member
Here, the well known member is a worker node
<members>
<member>
<hostName>as.wso2.com</hostName>
<port>4200</port>
</member>
</members>
|
3. Configuring the port offset and host name
Edit “<AS_HOME>/repository/conf/carbon.xml” file as follows
<Offset>1</Offset>
<HostName>as.wso2.com</HostName>
<MgtHostName>mgt.as.wso2.com</MgtHostName>
|
4. Mapping the host names to the IP
Update the “/etc/hosts” file
127.0.0.1 as.wso2.com
127.0.0.1 mgt.as.wso2.com
|
5. Allow access the management console only through LB
Configure the HTTP/HTTPS proxy ports to communicate through the load balancer
Edit “<AS_HOME>/repository/conf/tomcat/catalina-server.xml” file as follows
<Connector protocol="org.apache.coyote.http11.Http11NioProtocol"
port="9763"
proxyPort="80"
<Connector protocol="org.apache.coyote.http11.Http11NioProtocol"
port="9443"
proxyPort="443"
|
4. Configure the worker node
1. Unzip the WSO2 AS
2. Setting up the cluster configurations
Edit “<AS_HOME>/repository/conf/axis2/axis2.xml” file as follows
*** Enable clustering for this node:
<clustering class="org.wso2.carbon.core.clustering.hazelcast.HazelcastClusteringAgent" enable="true">
<parameter name="membershipScheme">wka</parameter>
<parameter name="domain">wso2.as.domain</parameter>
<parameter name="localMemberHost">as.wso2.com</parameter>
<parameter name="localMemberPort">4200</parameter>
|
*** Specify the well known member
Here, the well known member is manager node
<members>
<member>
<hostName>mgt.as.wso2.com</hostName>
<port>4100</port>
</member>
</members>
|
3. Configuring the port offset and host name
Edit “<AS_HOME>/repository/conf/carbon.xml” file as follows
<Offset>2</Offset>
<HostName>as.wso2.com</HostName>
|
4. Configure the HTTP/HTTPS proxy ports to communicate through the load balancer
Edit “<AS_HOME>/repository/conf/tomcat/catalina-server.xml” file as follows
<Connector protocol="org.apache.coyote.http11.Http11NioProtocol"
port="9763"
proxyPort="80"
<Connector protocol="org.apache.coyote.http11.Http11NioProtocol"
port="9443"
proxyPort="443"
|
5. Create the worker2 node
Get a copy of worker1 node and change the following in axis2.xml and carbon.xml
<parameter name="localMemberPort">4300</parameter>
<Offset>3</Offset>
5. Testing the cluster
1. Restart the configured load balancer
2. Start the manager node
sudo <AS_HOME>/bin/wso2server.sh
3. Start the worker1 and worker2 nodes
sudo <AS_HOME>/bin/wso2server.sh -DworkerNode=true
4. Check member joined messages in all consoles
6. Access management console through LB https://mgt.as.wso2.com/carbon
Comments